Directing Users to the Enrollment Portal to Enroll Personal Devices
To direct users to the enrollment portal for user-initiated enrollment, you need to provide them with the enrollment URL. The enrollment URL is the full URL for the JSS followed by “/enroll”. For example:
https://jss.mycompany.com:8443/enroll
You can provide the enrollment URL to users in the way that best fits your environment.
Adding a Network Integration Instance
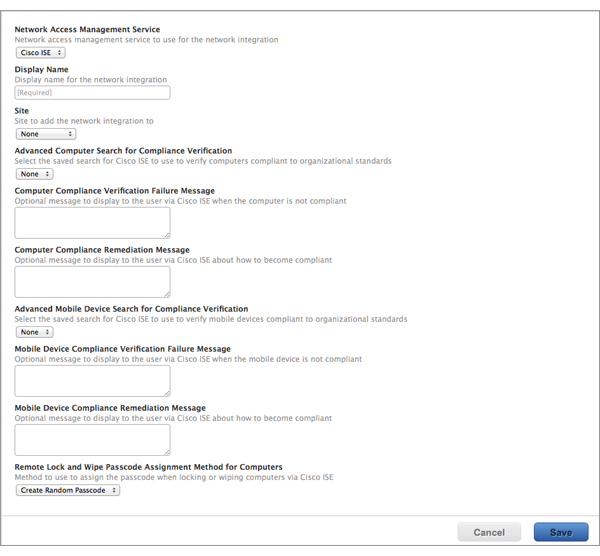
Optionally, you can automatically refer users to the enrollment portal by integrating the JSS with a network access management service, such as Cisco Identity Services Engine. (For more information on integrating the JSS with a network access management service, see Network Integration in the Casper Suite Administrator’s Guide.)
-
Log in to the JSS with a web browser.
-
If you have not already created and saved an advanced mobile device search to be used by the network access management service, do the following to create the search:
-
Click Mobile Devices at the top of the page.
-
Click Search Inventory.
On a smartphone or iPod touch, this option is in the pop-up menu. -
Click New
 .
. -
On the Search pane, select the Save this Search checkbox and enter a display name for the search.
-
Click the Criteria tab.
-
Click Add
. -
Click Choose for “All Criteria“, and then click Choose for “Managed”.
When the “Managed” criteria is displayed, make sure the operator is set to “is”. -
Click Browse
 , and then click Choose for “Managed”.
 -
Click the Display tab and select the attribute fields you want to display in your search results.
-
Click Save.
The results of the search are updated each time mobile devices check in with the JSS and meet or fail to meet the specified search criteria.
Note: Additional criteria can be added as needed, depending on your organization’s compliance standards.
-
-
In the top-right corner of the page, click Settings
 .
. -
Click Network Organization.
On a smartphone or iPod touch, this option is in the pop-up menu. -
Click Network Integration
 .
. -
Click New
.
Note: Only one network integration instance can be added per site in the JSS. If all sites already have a network integration instance, you will not be able to add a new one. -
Configure the network integration instance using the settings on the pane, including the site, the advanced mobile device search to be used for compliance verification, and compliance messaging to be displayed to users.
-
Click Save.
After saving the network integration instance, a unique network integration URL appears at the bottom of the pane. This URL will be used by the network access management service to communicate with the specific JSS network integration instance.